

Let’s take a look at the online facility launched by EPFO through which EPF account holders can update their exit date in the records.
![]()

From January 2020, EPF introduced a new feature in UAN website for employees, enabling EPF members to update his or her date of exit (DOE) or the date of leaving the organisation without the help of an employer, after 2 months of leaving the job. The date of exit gets updated instantly. No employer approval or EPFO approval is required.
Earlier, the DOE could only be updated by the employer. If the exit date is not available in EPFO records, then an EPF account holder cannot withdraw money from his EPF account or even transfer funds from the Provident Fund (PF) account of previous employer to the PF account of the current one.
Additional Reading: How EPF Helps You Save On Tax
An EPF account holder can update the exit date in EPFO records online via the Member e-Sewa portal. Follow the steps mentioned below in order to update the ‘exit date’ in EPFO records:
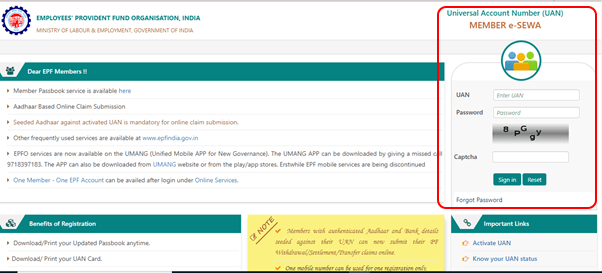
Step 1: Log in to the Member e-Sewa portal by entering your credentials such as your Universal Account Number (UAN), password, and captcha code. Remember it’s necessary for your UAN to be activated on the portal for you to log in to the portal.

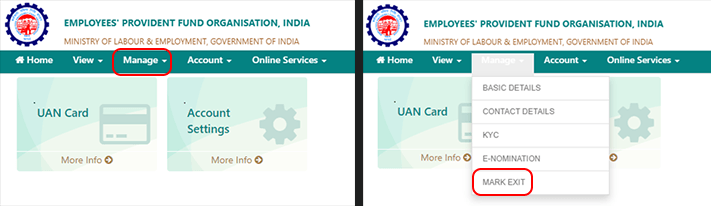
Step 2: Click on the ‘Manage’ tab and select the ‘Mark Exit’ option.

Step 3: A new tab will open on your screen. Proceed to select the employer and EPF account for which you wish to update the exit date. The date of exit can only be marked two months after the last contribution made by the employer. While entering the date of exit, you can enter any date of the month in which last contribution was made by your previous employer. You can find this in your EPFO passbook records.
Step 4: Proceed to enter the date of exit and reason for exit.
Step 5: Once you have updated the date, click on ‘Request OTP’. A one-time password (OTP) will be sent to your Aadhaar-linked mobile number.
Step 6: The last step is to click on ‘Update’ and then click on ‘Ok’.
The exit date will be updated in your EPFO records.
Additional Reading: EPF Vs PPF: Which Is Better?
Wondering why it is necessary to transfer your PF from your old employer to the new one?
Once an individual takes up employment in any of the PF-registered organisations, he or she will be registered for PF, and both employee and employer will have to make regular, monthly contributions to the employee’s PF. This accumulating fund earns interest till withdrawal. Further, in the event that the individual switches his or her job, what happens to the PF account of the employee already created with the previous employer? The employee will have two options in such cases. Either the employee’s contribution with interest can be withdrawn if the employee continues to be on break for up to 60 days; or the PF balance in the account created by the previous employer can be transferred to the account created by the current employer.
In order to transfer your funds to the PF account created by your current employer, it’s necessary that you update the date of exit for the previous employment.
Additional Reading: Quit Your Job? Here’s How To Withdraw Your PF And EPS Money
Looking for financial products such as Credit Cards or Personal Loans? Click below to get started!